Project Description
This project is by far the largest that we have done this year. To start it off, we learned about the sun and solar energy. After we learned all the basic concepts, we had to design and build a solar water heater. Our water heater ended up being successful because we were able to heat a large amount of water up in the time allotted. The next step for this project was making a client needs survey. In the survey we gave the students and teachers a chance to choose what they would want in an outdoor classroom. From this data we concluded what we needed and started the site search. On this stage, we went around campus and looked for good spots for our classroom to be. We then chose our best option and started to design our classroom. After we made various blueprints and gathered what materials we would use, we put together a presentation. In the middle of the design stage, we also worked on a wind turbine lab to learn about more alternate energy sources. After all smaller labs, we finished our projects and presented to the judges.
Evidence
Solar Water Heater
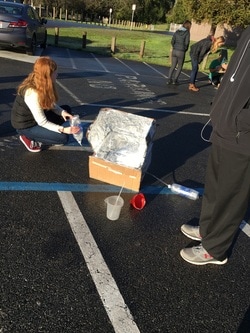
The solar water heater lab was the start of this long project. Our task was to design and build a solar water heater that can heat up water in a relatively short amount of time. In this part of the project we learned about the Sun's location, as well as insolation and reflective objects. Our group did exceptionally well on this portion of the project. We had a basic heater that was able to fit a large amount of water into the tubes at one time, and it all heated properly. This made our results exceptional.
The solar water heater lab was the start of this long project. Our task was to design and build a solar water heater that can heat up water in a relatively short amount of time. In this part of the project we learned about the Sun's location, as well as insolation and reflective objects. Our group did exceptionally well on this portion of the project. We had a basic heater that was able to fit a large amount of water into the tubes at one time, and it all heated properly. This made our results exceptional.
Client Needs Survey
In this part of the project we discussed things that we would want in a our outdoor classroom. We then made a google spreadsheet and listed things that we could put into in the design. The next stage was to put the information into a document and give it to students and teachers. We then waited for results. After we found our data, we used the information to decide what our designs should be/ incorporate. Here is the link to the spreadsheet.
In this part of the project we discussed things that we would want in a our outdoor classroom. We then made a google spreadsheet and listed things that we could put into in the design. The next stage was to put the information into a document and give it to students and teachers. We then waited for results. After we found our data, we used the information to decide what our designs should be/ incorporate. Here is the link to the spreadsheet.
Site Selection
In this section of the project we scouted sites to build the outdoor classroom. The first step was to wander around campus looking for open areas to choose an ideal location for what we are planning to do. After we found our locations, we discussed why we chose them, and ranked them from one to three. This is the section of the project where my group decided to build on top of the crates behind the art room.
In this section of the project we scouted sites to build the outdoor classroom. The first step was to wander around campus looking for open areas to choose an ideal location for what we are planning to do. After we found our locations, we discussed why we chose them, and ranked them from one to three. This is the section of the project where my group decided to build on top of the crates behind the art room.
Materials Testing Lab
You cannot make a building without the right materials. In this part of the project we tested out materials to use in the building stage. We first designed two separate tests to see which materials we could use. In one of the labs, we tested for water resistance, and in the other lab, we tested for heat and cooling. In this part, we were able to distinguish what types of wood we would use for fences and tables in our classroom. Here is the link for the data.
You cannot make a building without the right materials. In this part of the project we tested out materials to use in the building stage. We first designed two separate tests to see which materials we could use. In one of the labs, we tested for water resistance, and in the other lab, we tested for heat and cooling. In this part, we were able to distinguish what types of wood we would use for fences and tables in our classroom. Here is the link for the data.
Building Design and Presentation
This stage was the longest and most challenging part of the entire unit. We needed to do many things before presentation night:
This stage was the longest and most challenging part of the entire unit. We needed to do many things before presentation night:
- Have Blueprints and Connectors for every object
- Have a 3D blueprint of some kind
- Have a practiced presentation
- Have the total price for our project
- Any extra pieces of the project we need to present
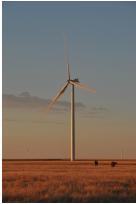
Wind Turbine Lab
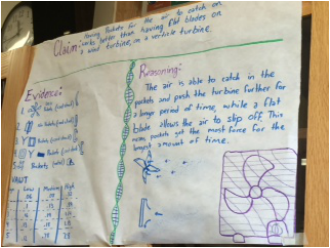
This was the last portion of the project, and for me was the most entertaining. The goal was to make a windmill that could spin a fast as possible on a horizontal axis and a vertical axis. We ended up only using the vertical axis in our designs for convenience, so our data was one sided. We found that the most successful design for this lab was a pinwheel. We used this in our claim which was, "Pockets for air is more effective than having no pockets on a vertical wind turbine." We proved this by showing our many designs and the data that followed. The more curved and funnel-like the windmill became, the faster it would spin at any speed. Here is a picture of our poster.
This was the last portion of the project, and for me was the most entertaining. The goal was to make a windmill that could spin a fast as possible on a horizontal axis and a vertical axis. We ended up only using the vertical axis in our designs for convenience, so our data was one sided. We found that the most successful design for this lab was a pinwheel. We used this in our claim which was, "Pockets for air is more effective than having no pockets on a vertical wind turbine." We proved this by showing our many designs and the data that followed. The more curved and funnel-like the windmill became, the faster it would spin at any speed. Here is a picture of our poster.
Concepts
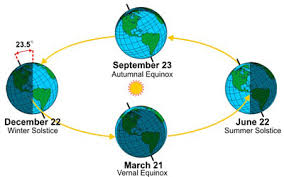
Solar Angles: The Sun's rays fall differently onto the Earth each day because of the rotations and revolutions of the Earth and Sun along with the Earth being tilted at 23.5 degrees. The northern hemisphere will have more direct light in summer and less in winter. You can see where the Sun will hit Earth in the diagram on the left.
Atomic Structure:
Atoms are the basic structure/building block of all matter.
-protons- have a positive charge, in nucleus
-neutrons- neutral charge, in nucleus
-electrons- no mass, negative charge, orbits nucleus
The number of protons is the atomic number. The number of protons and neutrons combined is the atomic mass.
Isotope: an atom with an unusual number of neutrons
Ion: an atom with an unusual number of electrons
Atoms usually have an equal number of protons, neutrons, and electrons if they aren't an ion or an isotope.
Molecule: 2 or more atoms bonded together
Compound: a molecule made of different elements
States of matter:
solids: Molecules are bonded firmly and hold densely. They hold the least energy/heat.(ex. ice)
liquids: Molecules are bonded and can move around and change bonds. Holds more energy/heat.(ex. water)
gases: Molecules are very rarely bonded(1/100th as dense as solids). Most energy/heat.(ex. steam)HeatSpecific heat capacity:
The specific heat is the amount of heat per unit mass required to raise the temperature by one degree Celsius. A higher specific heat means that it is harder to heat a material.
Heat transfer:
Conduction: heat transfer through solids
Convection: heat transfer through a fluid(liquid/gas)
Radiation: heat transfer through waves or ray(no medium required)
Insulation is the opposite of conduction.
Conduction: good at transferring heat.
Laws of Thermodynamics:
0th law: If two systems are in thermal equilibrium with a third, then they are in equilibrium with each other. (A=B and B=C, so A=C)
1st law: Conservation of Energy: energy is neither created or destroyed. but transferred from one form to another. Heat is a form of energy.
2nd law: Entropy increases. Over time, everything becomes the same temperature.
3rd law: Temperature can never reach absolute zero. Heat always exists.
Why We Should Use Less Electricity
|
The modern world is a world of technology. To fuel technology and present day living, humans need energy. Right now we use so much electricity each year, and the ways we can get it are unhealthy for the environment. As we researched, there are ways to help the world heal again. If we harness the wind's energy, or use the sunlight, we can have cheap and efficient energy without hurting the Earth. Right now, the ozone layer is wearing down due to the burning of fossil fuels. If we change how we get energy, we will not have to worry as much about skin cancer, or polluted air.
|
|
Reflection
As I have mentioned many times before, this was the longest and most challenging project this year. For a project like this it would have been great to have a group that worked together well. For me it was a mediocre project at best. My group did not hate each other, but we did not get along because we were all so adamant about our ideas. I ended up having to be apart of the most embarrassing presentation of the year, because our idea was unsafe and completely unfeasible. The whole time I was against the idea of building on top of the crates, but I could never get my team to budge. It was mostly negatives in the process of this project, but their were some positives. One, I was completely in charge of the building of the windmills, so I could make whatever I thought was good. This helped me have some fun through this frustrating project. Another upside was that I got to work with Jeffrey on the building of the 3D model, and I got to learn how to use Tinkercad. I could name many downsides, but the two main ones were teamwork, and communication. My team did not work together well at all, so we could not get as much done as we should have. This also corresponds to my second issue which is communication. The second half of our group never told us what they were doing, or gave us any ida on what we could do to help them. This made the project very hard.
